YouTube lets you connect with people – 1 billion of them to be exact.
That’s how many people visit YouTube every month. The site’s extreme popularity is why we’ve highlighted YouTube in the past with posts like How to Go Viral on YouTube and The Top 10 YouTube Channels.
But we’ve never written about YouTube annotations – and how they can greatly improve your videos by adding an interactive element. This post is all about delving into interactivity on YouTube: why to do it, how to do it, and what you’re capable of doing once you master it.
Why Make Your YouTube Videos Interactive?
More Views to More of Your Videos
The most basic reason of all — who doesn’t want more views?
YouTube annotations allow you to create links from one video to another or to a playlist. The right link will turn a one-time viewer into a serial viewer. And since YouTube allows you to make a link to your subscribe page right in the video, interactivity can boost your subscription rate as well.
Up-to-Date Messaging
After you publish a blog post, you can return to it and edit it whenever you want. A YouTube video isn’t so malleable: once it’s up there, it’s up – and if you want to make substantial changes you’ll have to take it back down and re-upload it (losing all of your views and comments in the process).
That’s a problem because the world keeps spinning and so too will your message.
That’s where annotations come in. Since they’re tacked on after you’re the video is uploaded, they’re easy to change in just a minute or two. That means you can keep your YouTube videos with whatever is new with you — whether that’s a list of upcoming events, your newest products, or your most recent blog posts.
A good YouTube video will continue to amass thousands of views for years and years after it’s posted. Design a video with YouTube interactivity in mind and it can still be working for you decades from now.
Easier to Navigate Videos
Have you ever been watching a tutorial video and had to skip around for minutes trying to find the one part you need to learn? Wouldn’t it be nice if there was a way to skip right to the part you need?
With YouTube annotations, it’s possible. You can set up a series of links in your video with titles referring to its different “chapters” — just like a table of contents. Your viewer will be able to read through the list, click on their desired chapter, and — poof — the video skips ahead to that exact location on the video.
Get Started with YouTube Interactivity in 3 Steps
(1) Access Your Video Manager
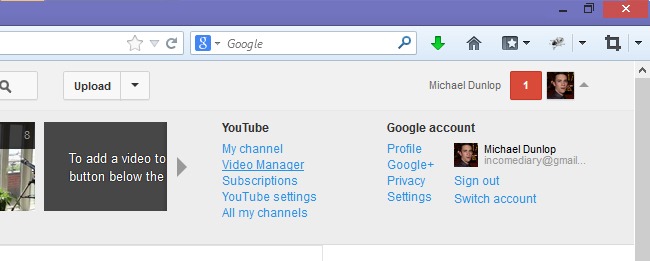 Log in to YouTube and click on the gray arrow next to your name in the upper right corner.
From there click on Video Manager in the ‘YouTube’ Column.
(2) Access Annotations Area
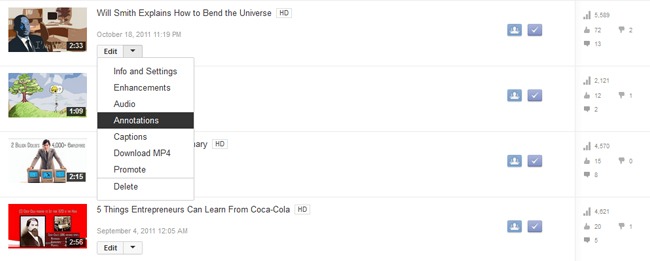 From the list of videos you’ve uploaded, select one to add interactivity and click on the downward arrow next to edit. Select Annotations from the drop-down menu.
(3) Add Annotations to Your Video
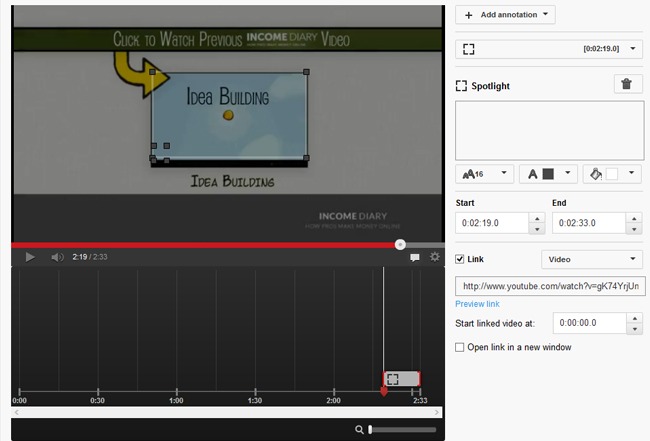 Click on the Add Annotation button to the right of your video, then start working down the list. You’ll have the option to add text, adjust its placement within the video, and make it link to other pages or videos.
I’ll dive into these features in the next section.
Making and Adjusting YouTube Annotations
There are five types of YouTube annotations. In the example above, we’re using the Spotlight style of annotation. A spotlight is a just thin outline of a box, so they are useful when you want to use an existing part of the video and turn it into an interactive element. In this case, we’ve incorporated a short clip of another Income Diary video and put a spotlight around its edges, essentially turning the video clip into a link to the full video.
I’ve made an image with an example of the remaining four types of annotations:
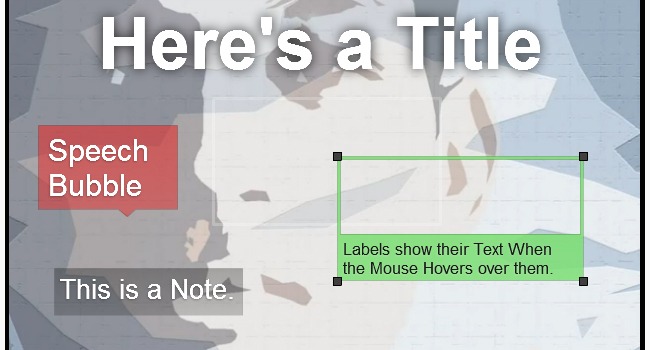
Titles allow for the largest font size; the Speech Bubble creates a playful cartoon speech box; Notes make a simple, useful rectangle; and Labels look a lot like spotlights, but they reveal text when you hover over them with your mouse.
Adding Text and Color
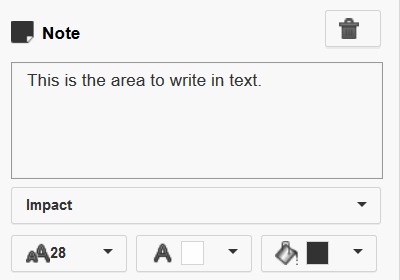 Use the white box to write in the text you want to appear with the annotation. You have a choice between four font sizes (11, 13, 16, and 28) unless you’re using a Title (48, 72, and 100). If you increase the font size but you don’t notice a change on the video, then you likely need to make the annotation box bigger.
Text must be either white or black, but you have an assortment of 34 colors to choose from for your annotations — including transparent. Your first priority here should be clarity, so make sure that there is a high amount of contrast between the text and the background color. You may also want to consider using colors associated with your brand or using attention-grabbing colors (e.g. red, orange, yellow) when making a call-to-action.
You also have the choice between two styles, Normal and Impact. I prefer the simplicity of Normal.
Positioning Annotations
When you make a new annotation, it will appear in your video. You can adjust its position by placing your mouse over the middle of the annotation, clicking, and dragging. It’s usually a good idea to place annotations on the periphery of the screen so that they don’t distract from the video, but in some cases, you may want the annotation to be the focal point – front and center.
You can adjust the size of an annotation by clicking and dragging any of the black rectangles that are on each corner. YouTube limits the size of the annotation so that it cannot take up more than 30% of the screen.
Annotations in Time
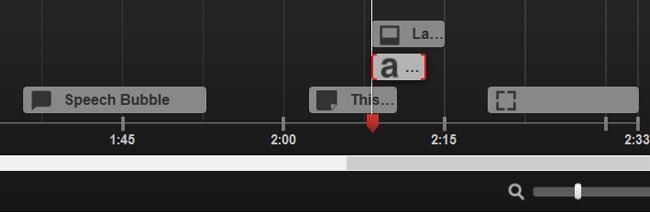 Once you’ve added your annotation, it will appear in the dark gray area underneath the video. By putting your mouse on either side of the annotation, you can extend it longer or make it shorter. By putting your mouse in the center of the annotation, you can move the whole thing forward and backward in time. You can also make this adjustment with the Start and End time fields to the right.
Once you’ve added your annotation, it will appear in the dark gray area underneath the video. By putting your mouse on either side of the annotation, you can extend it longer or make it shorter. By putting your mouse in the center of the annotation, you can move the whole thing forward and backward in time. You can also make this adjustment with the Start and End time fields to the right.
Choosing the right duration for your annotations is important. Too short and the viewer may not have time to read your message or click on your link. Too long and the annotation may distract from the video and overstay its welcome. Give your best guess at how long an annotation should stay up (probably about 5-7 seconds) and then watch the video from the beginning with the annotation. That will give you the best idea of whether or not you’ve chosen an appropriate length.
If you’re having trouble fine-tuning, you can use the magnify bar in the bottom right to get a closer look.
Turning Your Annotation into a Link
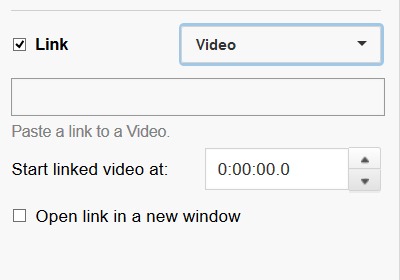 Here’s where we finally get to add interactivity: YouTube allows annotations to link to other Videos, Playlists, Channels, Google+ Profiles/Pages, Subscribe Pages, and Fundraising Projects.
 Types of Interactive YouTube Links and their Uses
Videos
This allows you to link to any other video on YouTube. This is the type of link that we use in the example video (Will Smith Explains How to Bend the Universe). Use it to link to one more related videos.
Since you can start the linked video at a second-marker of your choosing, you can select very specific portions of videos or even link to different parts within the same video. That’s how you make a table of contents for your video: a series of video links to different times in the same video.
Another use could be to allow the viewer to go back and re-watch a particularly tricky part of the video: “That last part about SEO was pretty technical, so click the button in the bottom right to go back and hear it one more time.”
Subscribe Pages
This is one of the most powerful links since every subscriber you get is another long-term viewer. When someone clicks on a subscribe link, it takes them to a special landing page for your channel with a big button saying ‘subscribe’.
I see no reason why you shouldn’t put a subscribe button in every video you post on YouTube. It’s as easy as putting a note in the bottom left corner that says ‘Subscribe’ in 13 pt text.
Channels
Your channel page is like the home page for your YouTube channel. This is a great stepping-stone for viewers who are interested in learning more about you and your videos but who might not yet be ready to subscribe.
Google+ Profiles/Pages
You can’t link a YouTube video to your Facebook, Twitter, or Instagram — but you can link directly to your Google+ page. If you have an active YouTube channel and a social media presence, then this is an awesome opportunity to start building a relationship with your viewers.
Playlists
For audiences, a playlist can mean more entertainment/information queued up for them without them having to bother with browsing for the next one. For you and your videos, it can mean the difference between getting one view or ten views. If you have a series of videos that make sense being watched in a particular order, you make a playlist and put a link to it in each one of those videos.
Fundraising Projects
YouTube recently started allowing users to link to their fundraising projects on 18 approved websites, including Kickstarter and IndieGoGo. This makes YouTube a great place to promote your campaign
If you’re thinking about crowdfunding, you can check out our Ultimate Guide to a Successful Kickstarter Campaign.
Can I Link from a YouTube Video to My Website?
This is the one interactive elements that my video clients ask for most — and the answer is yes: but you must first link your website to your channel using YouTube’s Webmaster Tools.
Once this process is complete, your website is officially an Associated Website of your channel and can be linked to with annotations. For an in-depth tutorial, click here.
How to Design Your Video from the ground up for Interactivity
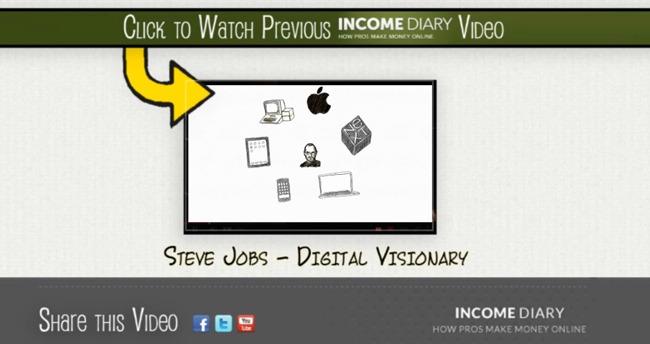
When I set out to make interactive videos for Income Diary, I made a special 1920 x 1080 px background in Photoshop comprised of branding elements taken straight from Income Diary’s site (above).
The focal point of the design is the spot in the center for a previous Income Diary video. When I finish each new video, I import the above template and the previous video file. Then I scale down the previous video so that it fits in the box and speed it up so that there’s more movement. After the video’s uploaded, it’s as easy as putting a spotlight around the miniature video and linking it up.
Another aspect of the above template is that there’s room in the bottom center for another annotation. That’s a prime spot for a note that says ‘Subscribe’.
How to Add Interactivity to an Already Uploaded YouTube Video
If you want to add interactivity to videos after the fact, don’t fret. You don’t need a fancy template and you don’t need to have planned anything in advance.
I recommend keeping it simple. Try putting a note in the bottom left that says, “Previous Video” and a note in the bottom right that says “Next Video”. Or simply put a note in the bottom center that says “Subscribe” and links to your subscription page.
In most cases, the bulk of the action will be in the center of the screen so it won’t be particularly distracting if there are notes discreetly placed at the bottom. Nevertheless, I don’t recommend putting these links up until the last 30 seconds or so of your video.
Conclusion
Do you have any questions about interactivity? I would be happy to answer them in the comment section.
Furthermore, if you have any insight into using YouTube annotations please share with our community below.
Finally, if you want to learn more about how to succeed on YouTube check out our 21 ways to Dominate YouTube.